It is possible to download card reader techniques (CRTs) into your Passap E6000 console from your PC, but it requires a bit of technical know-how. If talk of bits, bytes, binary and hexadecimal notation bores or intimidates you, you may want to stop reading now.
Still with me? Great!
Unfortunately, at this time, neither Creation 6 nor Win_Crea allow downloading of card reader techniques. So, we'll have to write our own program. Don't worry; it's just a short batch file. Just follow the steps below:
echo off
set /p passapcrt=[Enter name of Passap knit tech file. (example, abc.kt)]
mode com1:1200,e,8,1
type %passapcrt% > com1
echo Your technique has been downloaded.
Pause Press any key to exit.
exit
If you download using a different a
communications port other than com1, be sure to change the references in
the program from 'com1' to the correct communications port, for example 'com2'
or 'com3'.
Or, save yourself some time and download crt.bat by right clicking on the link and choosing 'Save'.
Creating the data file that we will download will take a bit more effort.
We will use the card reader technique on page 33 of volume 52 of the Passap Model Book as an example of how to create a CRT data file. Here is the technique as it appears in the model book:

We can write out the technique in binary notation using a '1' to represent the black squares and a '0' to represent the white squares. Let's start with the first (bottom) row:
Row 1:00000001 00000001 00000001 01000111 11110000
The spaces have been added for readability. In computer speak, each individual 1 or 0 is referred to a bit. Each group of 8 bits is referred to as a byte. Let's continue with the rest of the rows:
Row 2: 00000000 00000001 00000000 00000001 00000000
Row 3: 00000001 11101001 11101111 00000001 00000000
Row 4: 00000000 00000000 00000000 00000000 00000000
These 1's and 0's are the binary data that make up the card reader technique. This is the stream of bits that will be sent down the communications port to the Passap console.
There is another way to write the binary data that is more compact called hexadecimal notation. Each group of 4 bits is converted to number or a letter according to the chart below:
| 0000 | 0 | 1000 | 8 | |
| 0001 | 1 | 1001 | 9 | |
| 0010 | 2 | 1010 | a | |
| 0011 | 3 | 1011 | b | |
| 0100 | 4 | 1100 | c | |
| 0101 | 5 | 1101 | d | |
| 0110 | 6 | 1110 | e | |
| 0111 | 7 | 1111 | f |
Let's re-write the rows using hexadecimal notation:
Row 1: 01 01 01 47 f0
Row 2: 00 01 00 01 00
Row 3: 01 e9 ef 01 00
Row 4: 00 00 00 00 00
There, the bytes are written in hexadecimal notation now.
This series of bytes make up the CRT data. There's just one problem with it. In the fourth row, only the first byte is part of the CRT. The remaining bytes in row 4 are just leftover blank space on the diagram. Here's the correct CRT data:
01 01 01 47 f0 00 01 00 01 00 01 e9 ef 01 00 00
How do we know where the CRT data ends?
The CRT data is made of two parts. The first part defines the technique. The second part is a built-in stitch pattern. If you look at row three, you will see byte ef. This byte has a special meaning. The end of the definition portion of the technique occurs two bytes after the row containing the ef byte. (Note: the ef byte does not always appear in the same place in the CRT, but it always signals the upcoming end of the technique definition.)
The built-in pattern then follows on the third byte after the ef byte. To calculate the number of bytes the built-in pattern will use, we must look at bytes 2 and 3. Byte 2 is the width the pattern and byte 3 is the length. Hence, the built-in technique is a 1 by 1 pattern. Therefore the first byte of row four is the built-in pattern.
In most CRT's bytes 2 and 3 will indicate a 1 by 1 pattern and you will only add one additional byte for the pattern. Please note that the built-in pattern always starts three bytes after the ef byte.
Sometimes bytes 2 and 3 indicate a longer built-in pattern. In that case you will need to calculate the pattern length. First convert bytes 2 and 3 to the familiar decimal notation:
| First Digit | Second Digit | ||
| Hex | Decimal | Hex | Decimal |
| 0 | 0 | 0 | 0 |
| 1 | 16 | 1 | 1 |
| 2 | 32 | 2 | 2 |
| 3 | 48 | 3 | 3 |
| 4 | 64 | 4 | 4 |
| 5 | 80 | 5 | 5 |
| 6 | 96 | 6 | 6 |
| 7 | 112 | 7 | 7 |
| 8 | 128 | 8 | 8 |
| 9 | 144 | 9 | 9 |
| a | 160 | a | 10 |
| b | 176 | b | 11 |
| c | 192 | c | 12 |
| d | 208 | d | 13 |
| e | 224 | e | 14 |
| f | 240 | f | 15 |
To use the conversion table look up decimal equivalent of the first digit and add it to the decimal equivalent of the second digit. For example the decimal equivalent of a7 is 160 + 7 = 167.
Once you have the width and length bytes converted, multiply them together and then divide the result by 8. If there is a remainder, round up to the next nearest whole number. This is the number of bytes in the built-in pattern.
Now you know how many bytes to include in the CRT. It's a bit complicated, but most CRT's use only one byte for the built-in pattern.
Unfortunately we can't just use Notepad to type in the bytes and have a binary data file. Notepad only does text (ASCII) files.
We need hexadecimal editor to enter binary data. Frhed.exe is one such editor. You can download Frhed from here: http://www.kibria.de/frhed.html.
Run Frhed and enter the bytes. Your screen should look like this:
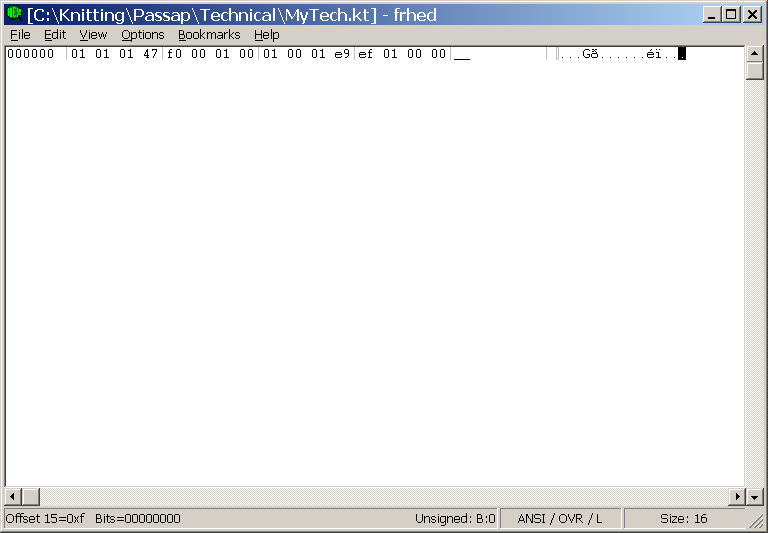
Save your data file. I usually use 'kt' for the file extension. In this example, I named the file 'MyTech.kt'
Now it's time for your hard work to pay off.
Plug the Passap console into the appropriate communications port just as you would if you were downloading a stitch pattern.
If you download a stitch pattern from Win_Crea, be sure to exit it once you are done so that the communications port is available again for our program.
When the console flashes 'KNIT.TECH,' press the blank key followed by the zero key. The console will show 'PC START.' Now run the crt.bat program you created earlier. You will see a screen like this:
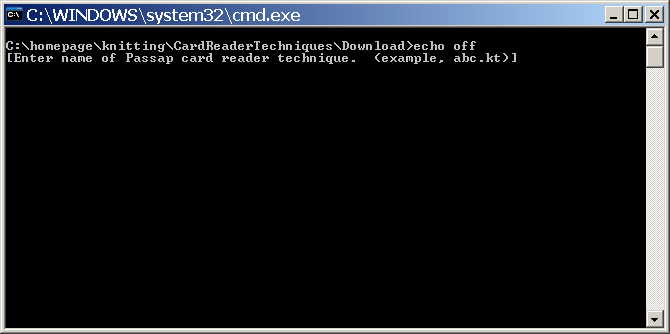
Enter the name of your knit technique:

Your technique will download and the Passap console will display 'WAIT.' Once the tech is complete the console will move on to the next dialog and the PC will indicate that technique has been downloaded:
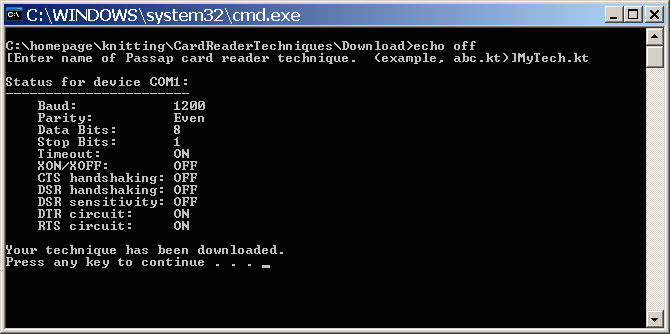
Congratulations, you have successfully created and downloaded a card reader technique.